My previous blog talked about how to create a Windows PE boot image. Next you need to know how to boot it. And there are plenty different ways to do that. These days, the most useful way is via a USB key on a UEFI system, so let’s start there.
USB boot via UEFI
UEFI requires a FAT32 volume for booting; it doesn’t support booting from NTFS. The boot process itself looks for a particular file, for example \EFI\BOOT\BOOTX64.EFI on an AMD64 (64-bit) system. That file then loads the boot configuration data (BCD) form \EFI\Microsoft\BOOT\BCD, which tells it what Windows installation to boot. Fortunately, the ADK includes a folder structure called “Media” that makes it easier to set all this up.
Let’s walk through a PowerShell script to set up a USB key. First, we need to know the source and destination details:

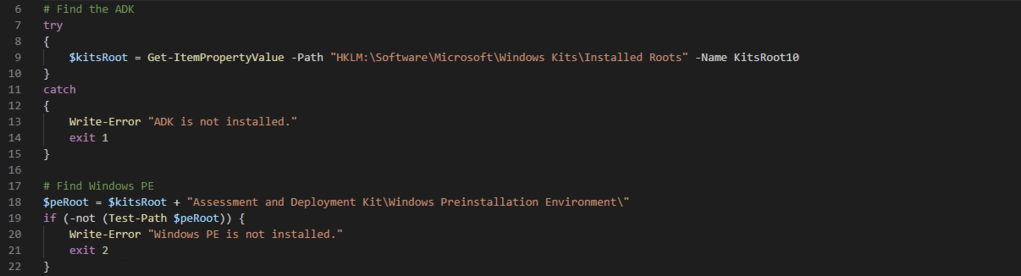
Next, we need to find the ADK and Windows PE files.

To provide a little bit of safety, it’s good to verify that the drive letter is actually a removable disk, since the next step is to format the drive as FAT32, a destructive operation. That’s simple to do:

Then we can format the drive:

And copy the whole “Media” folder structure from the ADK to the media, which puts all the needed files in the right places. Technically this copies more than you really need (as you probably don’t care about having all the different sets of language resources, since you’re unlikely to ever see a boot menu anyway), but it’s not worth the hassle to filter out the extra stuff.

Lastly, we need to put the Windows PE boot image in the right spot. Technically, the “right spot” could be anywhere, as long as the BCD points to it. But since the “media” folder that we copied already includes a BCD that points to \Sources\boot.wim, the easiest solution is put the Windows PE boot image in that exact location (using “boot.wim” as the file name, instead of whatever name it originally had).

That’s all there is to it. You can now eject your USB key, insert it into a UEFI system, and boot from it.
While in theory you could have a single USB key that can be used to boot all three platforms (since each platform will look for a different “BOOT{arch}.efi” file), in practice it’s not worth the hassle because (a) you would have to create the BCD yourself, and (b) you can’t easily have per-platform BCDs so you would have to show a boot menu to let the user pick which one to boot.
See below for the full script, attached in a zip file.
USB boot via BIOS (CSM)
The previous script set up a USB key to boot a UEFI device. So what needs to be changed for a BIOS device (non-UEFI, which today typically means a UEFI device booting using a compatibility support module [CSM])? Absolutely nothing, because that same “Media” folder that we copied previously includes the necessary structure for non-UEFI systems as well: The “bootmgr” file at the root of the media, the BCD file in the \Boot folder, and a few other supporting files in that same \Boot folder (again with a lot of non-essential language files carried along, but not worth the hassle to remove).
Technically, a BIOS system can boot from an NTFS-formatted USB key, so you could switch from FAT32 to NTFS, but then you would have a USB key that would only work for non-UEFI, so it’s best to leave it as FAT32.
ISO boot via UEFI or BIOS (CSM)
No big surprise here: To create a bootable ISO, you also need tools and files from the ADK. The basic process is to create a folder structure that you want to build the ISO from, then to run the OSCDIMG.EXE utility to create that ISO. So this is a variation on the previous script. To keep things simple, I cloned the script and modified it to be able to make an ISO, since that is easier to follow. We’ll start off with some simple constants to specify where to get the Windows PE boot image, the architecture of that boot image, and the destination for the resulting ISO:

Next, we need to find the ADK (for the tools that we’ll need) and the Windows PE folder (for the boot files):
Now we need a temporary folder to hold the stuff that will be put into the ISO:

Then we can copy in the boot files and the Windows PE image itself:

And finally, we can capture the ISO:

That command line requires some explanation, because it’s really quite a messy one. So let’s review each of those command line options:
- -m: Ignore the size limit of the ISO. That doesn’t really matter in this case, but if you wanted to include other stuff in the ISO and use that ISO in a VM, this will let the ISO grow to any size required.
- -o: Using an MD5 hash of each file, don’t add duplicate files. This can help reduce the size of the ISO if for some reason you have duplicate files in it.
- -u2: Use the UDF file system. (Easiest explanation: This is what you want.)
- -bootdata: This is the messiest of them, specifying that this ISO should have two boot sectors on it. The first is used on BIOS-based system (“#p0”) and should use “etfsboot.com” to boot; the second is used on UEFI systems (“#pEF”) and should load “efisys.bin” to boot. (If you don’t want UEFI systems to prompt when booting from the ISO, you can change “efisys.bin” to “efisys_noprompt.bin” instead. Just be careful if you do that. BIOS systems are a little trickier; for those, you need to remove the \boot\bootfix.bin file from the boot files before capturing the ISO.)
- The last two parameters specify the source for the ISO ($isoTemp) and the destination ISO file that should be created ($isoNew).
You can find all of the command line parameters in the official documentation. Note that if you include Windows installation files, or anything else of any significant size in the ISO, and want to use that ISO on a non-UEFI system, you may also need to specify an order file to force the boot files to the beginning of the ISO. There is a working file in MDT (located in the “Templates” folder) by the name of “BootOrder.txt” that should work as-is. Just add that using the “-yo” switch as described in the documentation.
Hard drive boot
Booting Windows PE from a hard drive is pretty much the same as booting from a USB key, with the same file system requirements (e.g. FAT32 for UEFI) and files needed. But it’s more rare to need to do this, so I’ll leave this as an exercise for the reader. (You can look at the MDT LTIApply.vbs script if you care. The tricky part is that you’ll need to clean up some of the stuff placed on the drive before you can run BCDBOOT.EXE after applying a Windows 10 image, because the Windows PE BCD will cause errors when BCDBOOT encounters it.)
PXE boot
To boot Windows PE via PXE, you just need to import the needed Windows PE WIM files as boot images in the WDS console. Because WDS extracts all the extra files that it needs from the WIM files themselves, it doesn’t need the ADK or any other source for those files. But it will need to extract files from each Windows PE architecture, so be sure to import at least x86 and AMD64 boot images if you want it to work properly.
Scripts
You can find the sample scripts attached below.
Attached: USBPrep.zip
Attached: ISOPrep.zip