
Did I mention that I dislike proxy servers? I certainly talked a lot about them in this post, but let me go on the record to say I really, really dislike them (at least non-transparent ones) and wish they would just go away. But sadly, that’s not going to happen so we have to live with them.
When using Windows Autopilot, there are two ways to work with non-transparent proxy servers:
- Configure all the required URLs to bypass the proxy server altogether and access the internet directly. For some orgs, this might not be too bad, but given the size of the list and the fact that it can change periodically, this can take some effort – both in convincing the network and security teams that this is OK to do, and actually implementing it. If you can do this, great, then you don’t need to worry about proxy servers. But I’m assuming that if you keep reading this, then you’ve already discounted that option.
- Use WPAD to discover the needed proxy configuration, making sure those same required URLs can get through the proxy without any authentication (since those URLs are typically accessed in local system context with no way to authenticate). And yes, as I pointed out in my previous blog, the networking and security folks don’t like WPAD because they see it as a threat vector.
You could probably also use Windows Autopilot white glove pre-provisioning to take care of this: Pre-provision the device on a network that doesn’t need the proxy (e.g. a guest network with internet access), deliver the proxy settings to it as part of that pre-provisioning, and then ship it “proxy-ready” to the end user.
Making the case for WPAD as a “bootstrapping” mechanism
Let’s talk more about WPAD. It’s a simple enough concept: Using either DNS or DHCP, you can point clients to the needed proxy configuration. More importantly in the Windows Autopilot case, it is a mechanism that can be used to “bootstrap” the device so that you can get it to a managed state. After it is in that managed state, you can use Intune or GPO to push a set of policies that configure the proxy and disable WPAD.
Think about that a little bit though: That means WPAD is enabled by default in Windows, and there’s no way to turn it off until the device is in a managed state. (You can eventually turn it off manually too by unchecking the “Automatically detect proxy settings” checkbox in the browser.) So the networking and security folks that refuse to implement WPAD aren’t really doing anything to stop WPAD – they are just keeping it from working in the one place where it will be most secure, on your corporate network.
By the way, WPAD is also used on iOS, Android, ChromeOS, and Linux. Whether there are even any policies on those platforms to disable it is a research activity I’ll leave to you.
So what’s the risk of having it on? If you are on an untrusted network (e.g. a random open Wi-Fi network you connected to in an independent coffee shop), it serves you an IP address via DHCP with a DNS suffix, e.g. “hacker.com.” Windows would then look for, and talk to “wpad.hacker.com” to get proxy settings, and talk to whatever proxy server that points to. (There’s also logic that causes it to walk up the DNS tree, so even on a trusted network you might end up getting proxy settings from a place you wouldn’t expect. See Wikipedia for more details.) That proxy server could snoop on your activity without your knowledge. But on a trusted network, it’s goodness.
Setting up WPAD via DNS
In the DNS case, the device will pick up its DNS suffix, e.g. “contosocm.com,” from DHCP, and then automatically try to resolve the “wpad” host from that domain, e.g. “wpad.contosocm.com.” If it can resolve that name (usually defined in DNS as a CNAME to the “real” host), it will try to download a proxy PAC script from a URL that the client constructs, e.g. “http://wpad.contosocm.com/wpad.dat.” That script would look something like this:
function FindProxyForURL(url, host)
{
return “PROXY contoso-proxy.contosocm.com:80”;
}
Generally, the file will end up being more complicated than that (routing some URLs directly, while others go to the proxy server), but if you’ve already got a complex proxy server this file already exists – it might not be called wpad.dat and might not be at the root of any HTTP web site, but it can be copied as wpad.dat and place on an appropriate site. To get IIS to actually serve it up, you will likely need to add a new MIME type for the .DAT extension:
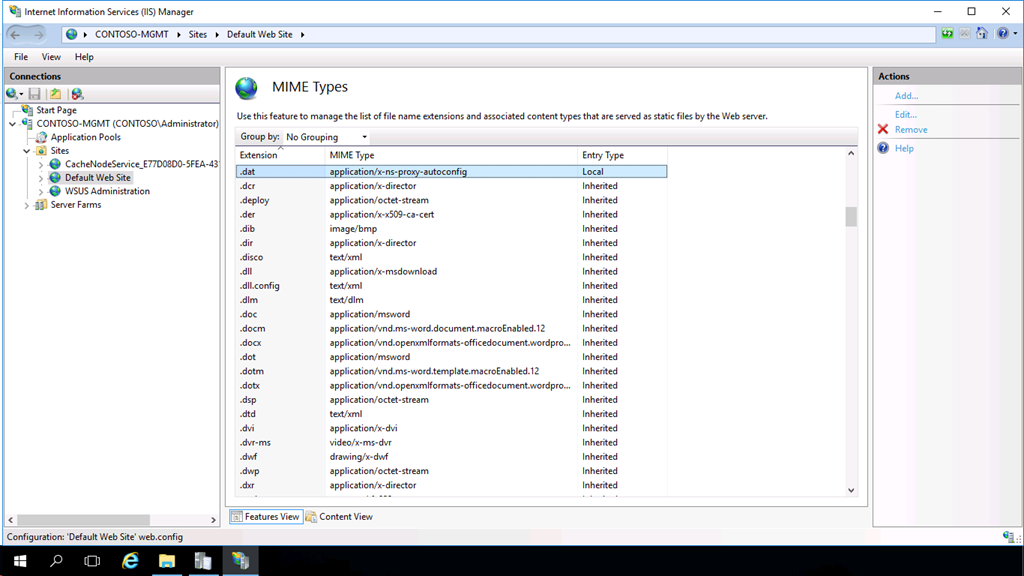
And in the “Content View” you can see the wpad.dat:

That’s all that is required to set up WPAD via DNS.
Settings up WPAD via DHCP
You can also configure WPAD via DHCP. This is done by specifying the explicit WPAD URL in DHCP option 252; Windows will use that URL to retrieve the proxy PAC file (which doesn’t have to be named WPAD.DAT in this case – you can call it anything you want, but using a name like “proxy.pac” is fairly common).
The first task that needs to be completed: Adding option 252 to DHCP. On Windows Server DHCP, this option is not present by default and needs to be added. That can be done via a simple PowerShell command:

Once that is done, you can then add option 252 as either as server option or a scope option:
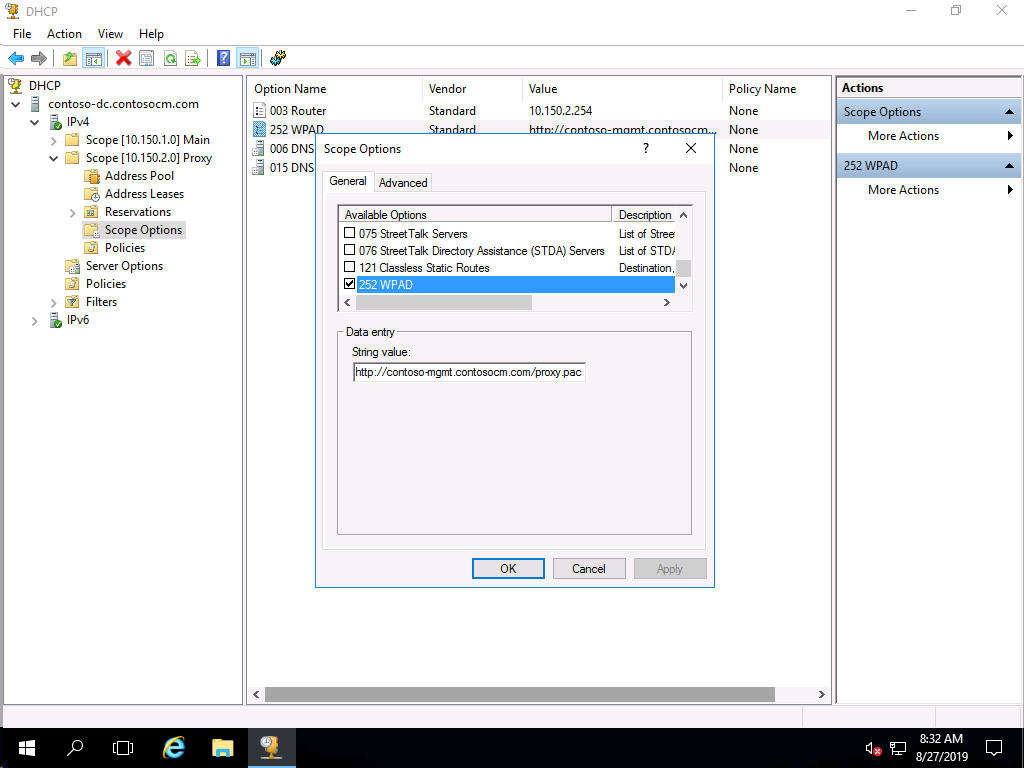
Notice that I used a slightly different URL here (using “proxy.pac” as I mentioned), and since that used a different file extension this also required adding that extension as a MIME type in IIS, using the same process as previously described.
Per the IE11 WPAD documentation, if WPAD settings are found in both DHCP and DNS, the DHCP settings will win.
WPAD without DNS or DHCP
Let’s say you want to try this out (or you already know that your network and security folks won’t allow it). We don’t presently have a way in Windows Autopilot (really, in OOBE) to specify proxy settings. But you can try the next best thing: Using the local “hosts” file, you can create a WPAD entry that only works from that one machine, pointing it to a web server that contains a wpad.dat file (delivered via HTTP only). So, as long as you can create a web server and put the wpad.dat on it, you’re halfway there.
So how do you get the entry in the hosts file? You can certainly edit the file manually (C:\Windows\System32\Drivers\Etc\Hosts), adding a line that looks something like this:
10.150.1.102 wpad.contosocm.com
Or if you’re like me and expect to do this over and over again, you can use a script. Here’s a PowerShell version:
# Process each interface that has a connection-specific suffix
$proxyIP = “10.150.1.102”
$hosts = “$($env:WINDIR)\system32\drivers\etc\hosts”Get-DNSClient | Select InterfaceAlias, ConnectionSpecificSuffix | ? {$_.ConnectionSpecificSuffix} | % {
# Create a new entry for wpad.domain.com pointing to the specified IP address
$proxyHost = “wpad.$($_.ConnectionSpecificSuffix)”
Add-Content -Path $hosts -Value “$proxyIP $proxyHost”}
# Flush DNS
ipconfig /flushdns
Not terribly complicated: Get all the active connections that have a connection-specific DNS suffix (set via DHCP) and add a WPAD entry for each one, using a hard-coded IP address (because there’s no good way to discover the IP address of the proxy server). Of course this only works with an Ethernet connection – the device needs to be connected to the network at the beginning of OOBE, otherwise it won’t find any DNS suffixes. If that’s an issue for you, you can just hard-code the “Add-Content” line to add a specific entry to the bottom of the hosts file.
Then you can take it one more step: Embed that PowerShell script in a provisioning package so that you don’t even need to do any significant typing to run it. If you haven’t done that before, here are the steps:
- Launch the Windows Imaging and Configuration Designer (if you have the ADK installed) or the Windows Configuration Designer (available in the Microsoft Store).

- Create a new “Advanced provisioning” package (which just means “no wizard, let me edit it manually”) and give it a name.

- Specify that it is for “All Windows desktop editions.”

- You don’t need to import anything, so click “Finish.”
- Search for “command” to find the settings that contain that word (a convenient way to filter).

- Click on “Command files.” Then select the PowerShell script from above, saved to a file (AddWPAD.ps1 in my case)

- Click “Add” to add it to the provisioning package.
- Then click on “Command line” and specify an appropriate command line, e.g. “powershell.exe -NoProfile -ExecutionPolicy bypass -File .\AddWPAD.ps1”).

- Save the provisioning package definition (from the File menu) then choose Export –> Provisioning package from the menu.
- Change the owner to IT Admin.

- You don’t need to sign or encrypt the package (nothing sensitive in it anyway), so click Next. You can use the default location, so click Next again. Then click Build to create the PPKG file, and Finish to exit the wizard.
Now you can copy that PPKG file to a USB key – ideally it should be the only PPKG on the USB key so that it’s automatically selected. And if you want to try this out with a virtual machine, you can take it one step further and put the PPKG into an ISO file, then mount that ISO into the VM. Copy the PPKG into an empty folder and use OSCDIMG (also from the ADK) to create the ISO using a command line something like this (where “.\ISO” is the path to the folder containing the PPKG):
“C:\Program Files (x86)\Windows Kits\10\Assessment and Deployment Kit\Deployment Tools\amd64\Oscdimg\oscdimg.exe” -n .\ISO .\AddWPAD.iso
To use this, boot up the machine/VM with the USB key/ISO in place. On the first screen of OOBE (choosing a language or locale), press the Windows key five times to get to this screen:

The first item is selected by default, so you can just click “Continue.” That should automatically process the PPKG. You’ll see a different screen while that’s happening:

When it’s done, it will go back to the previous OOBE screen, where you can proceed as expected. Oddly, you may see the network screen initially show something like this:

It doesn’t happen all the time, but this will always fix it:
- Press Shift-F10 to open a command prompt.
- Type “start http://www.bing.com” to open Internet Explorer.
- Close Internet Explorer and exit from the command prompt.
You should then notice that the screen changes to enable the Next button:

I have a pretty good idea why that’s happening, but I don’t have any time to fix it right now (and a little more on the reason can be found below).
So now you can proceed normally through the Windows Autopilot process. The Autopilot profile is downloaded and processed, you can sign into AAD, enroll in Intune, and fully configure the device, all using the proxy server (as long as there’s no authentication required – make sure you whitelist all the needed hosts).
It can get even hackier
I had started off using Niall Brady’s script that he published in his Windows-Noob blog, which uses a different approach: It sets the proxy server location in the registry and WinHTTP. (I embedded that into a PPKG and ISO the same way that I described above.) While it would get through the machine OOBE/device ESP and user sign-in processes, the user ESP would time out trying to talk to Intune. This happened because the proxy from OOBE didn’t get set in the “new” user environment when the user signed in. I worked around that by putting the proxy settings into the default profile registry (C:\Users\Default\NTUSER.DAT) so that they were there from the time the user signed in. That worked, but it’s messy. Really, the whole setup is messy. And if I tried to simplify it using Intune to push proxy settings, it seemed to get worse. So I gave up on that approach. I might come back to it more later, but I think I’ll look at other API-based options first.
One of the things you’ll notice in Niall’s script is that it launches Internet Explorer in OOBE. There’s actually a reason for that, tied to the issue I discussed in the previous section. When IE launches and sees that the proxy settings have changed, it will send a notification to Windows telling all other processes that the proxy settings have changed, so they then check for those changes. The workaround I described above (manually launching IE) accomplishes the same thing.
I also managed to avoid the reboot described in his blog, but the process is still too messy to describe in any more detail.
We can make it better
Obviously there needs to be a better way to handle proxy servers during OOBE. Options that we are considering include:
- Providing an option to manually configure proxy settings during OOBE. Imagine that after connecting to Wi-Fi, you could click a “Configure proxy” button that would let you manually provide proxy server settings (e.g. a URL to a PAC file like “http://contoso-mgmt.contosocm.com/proxy.pac”, or an explicit proxy address like “contoso-proxy.contosocm.com:80”. Once configured, Windows would use that, at least until Intune or your management tool of choice could deliver alternative settings.
- Providing an option to deliver proxy settings via the Windows Autopilot profile. This would shorten the list of URLs that need to bypass the proxy server altogether (probably somewhere in the 5-10 range, instead of 50-100): You would get “just enough” from the direct connection to set the proxy server so that the remaining traffic could go through the proxy server.
- Providing an on-premises service of some type – something better than WPAD – that could provide proxy settings to the clients.
- Providing a mechanism to channel the network traffic through ExpressRoute (assuming you have an ExpressRoute connection to Azure).
If you have any preferences, please let me know.
If you read this far…
Congratulations, you must be very interested in proxy servers. If you are using a non-transparent proxy server of some kind, and bypassing that proxy to directly communicate with the internet (via a router/firewall) is not an option, or if whitelisting sites to avoid proxy authentication is going to be an issue for you, please contact me with details.


7 responses to “Windows Autopilot and proxy servers”
Very useful and informative post summarizing all the available options! Delivering the proxy settings via the Windows Autopilot profile seems like a good path forward, especially because the end-user would not have to do anything.
LikeLike
Having a subscribable XML list of the endpoints would be of great help, in the same way you have it for Azure. Especially when working with firewalls that do static URL->IP one time lookups.
(Submitted through our Swedish reps as an official request last year but haven’t seen anything yet)
LikeLike
Yes, that’s on our to-do list. We have to work through one product at a time. Intune is going first, then will start tackling the Windows pieces.
LikeLike
Intune-lists are also on the same feature list do please do 😉
The best thing would be if you could set a Proxy PAC for the WinInethttp once you are up and running, would save us head aches from a security stand point all over when there are non-transparent proxies.
LikeLike
We’re having this issue right now with ZScaler, which is a user-based proxy/gateway. So setting the proxy while Autopiloting is fine, but there needs to be a possibility for the user to login to the proxy. So we’re able to set the proxy.pac via Intune policy but the gateway waits on a user login, which does not happen, so we’re stuck on the ESP. Currently still evaluating solutions to overcome this issue…
LikeLike
Is there a way to specify a whitelist of URLs that can bypass authentication? https://oofhours.com/2019/07/19/windows-autopilot-and-the-joy-of-networking/
LikeLike
We run successfully an Autopilot / Intune provisioning with hybrid-joined devices in an staging network with WPAD service enabled and a customized whitelist on the non-transparent proxy. When we moved to normal client network with PAC file configured (and without WPAD service) the CompanyPortal (offline) shows new assigned applications as available and we can start installation. But then the process stuck at “Download pending” state. Back in staging network the app installation works fine. We noticed that in IntuneManagementExtension log file the “Current proxy” value is set to our proxy server in the staging network but in the normal client network the value is set to the Intune destination “*.manage.microsoft.com”. It seems, that the Microsoft.Management.Services.IntuneWindowsAgent.exe is not able to use the client’s proxy configuration?
LikeLike